
Set up SSH keys for Managed VPS
Set up a passphrase-protected Ed25519 key on your computer, then connect to your Managed VPS site with the details confirmed by Metro Vancouver IT.
For your site’s first SSH key, choose primary access through Support. Use the secondary SiteWorx workflow only when Support confirms it for your service.
1. Create a key on your computer
SSH opens a command line on the server. The key pair identifies your device. Both examples save a separate Managed VPS key named mvit_managed_vps in your own .ssh folder.
macOS Terminal
- Open Terminal from Spotlight or Applications → Utilities. Run each line and press Return.
mkdir -p "$HOME/.ssh" ssh-keygen -t ed25519 -f "$HOME/.ssh/mvit_managed_vps" -C "mvit-mac" - Enter a strong, unique passphrase and enter it again. The terminal may show no characters while you type. If asked to overwrite an existing file, type n. To make a new pair, rerun
ssh-keygenwith a different filename after-fand use that filename for the remaining steps. - Copy the public key. The command places the complete line on your clipboard without printing it.
pbcopy < "$HOME/.ssh/mvit_managed_vps.pub"
Optional macOS video · Servers.com. Follow the Ed25519 command and passphrase steps above when the video uses a different example.
Windows PowerShell
- From Start, open PowerShell, or choose a PowerShell tab in Windows Terminal. Run each line and press Enter.
New-Item -ItemType Directory -Force -Path "$env:USERPROFILE\.ssh" | Out-Null ssh-keygen -t ed25519 -f "$env:USERPROFILE\.ssh\mvit_managed_vps" -C "mvit-windows" - Enter a strong, unique passphrase and enter it again. The prompt may stay blank as you type. If asked to overwrite an existing file, type n. To make a new pair, rerun
ssh-keygenwith a different filename after-fand use that filename for the remaining steps. - Copy the public key to the clipboard.
Get-Content -LiteralPath "$env:USERPROFILE\.ssh\mvit_managed_vps.pub" | Set-Clipboard
Optional Windows video · DimensionQuest, from 3:30. Use the commands above for Ed25519 and skip any server password or server setup shown in the video.
2. Get your key installed
Primary site access · request it in Dashboard Support
For the primary SiteWorx account’s first key, Metro Vancouver IT provisions SSH access for the site’s Linux user and installs the key. In Dashboard → Support, choose New request. Use a subject like Managed VPS SSH access for example.com and include:
- Your Managed VPS service name and the exact domain you will work on.
- The full
ssh-ed25519line from your.pubfile. - A request for the SSH hostname, port, Linux SSH username, host key algorithm and full
SHA256:fingerprint, and the approved absolute path to your working directory.
Wait for support to confirm in the authenticated ticket that SSH access is enabled and your public key is installed. Use the connection details in that reply. If you only need to work with files in your domain directory, SiteWorx File Manager is available separately. It starts at the domain directory and does not install the primary user’s first SSH key.
Secondary SiteWorx user · only when enabled for your service
Start with a Dashboard Support request for your Managed VPS service and domain. Ask support to confirm that secondary SSH is enabled, identify the exact secondary SiteWorx user to edit, and provide the SSH hostname, port, host key algorithm, full SHA256: fingerprint and approved absolute working directory. Wait for the reply in the authenticated ticket before editing or connecting. Use the same request if you need individual teammate access or the fields below are missing.
- In the Dashboard → Services, open the Managed VPS for the site. Under Access & credentials, choose Log in to NodeWorx. If the button is missing, ask your account owner or Dashboard Support.
- In NodeWorx, open Reseller → Accounts. Find the correct domain and select its door icon to open SiteWorx, usually in a new tab. Check your browser’s pop-up indicator if it does not open.
- In SiteWorx, choose Administration → User Accounts. Select the pencil beside the designated Secondary user.

- Set SSH Enabled to Yes. Paste the one-line
.pubkey into SSH Public Key. If there is already a key in the field, ask support before replacing it. - Copy the generated SSH Username exactly as displayed. In the vendor example it is
mydomain_1. Use the value in your own form when connecting. Then select Save, reopen the editor and confirm the settings.
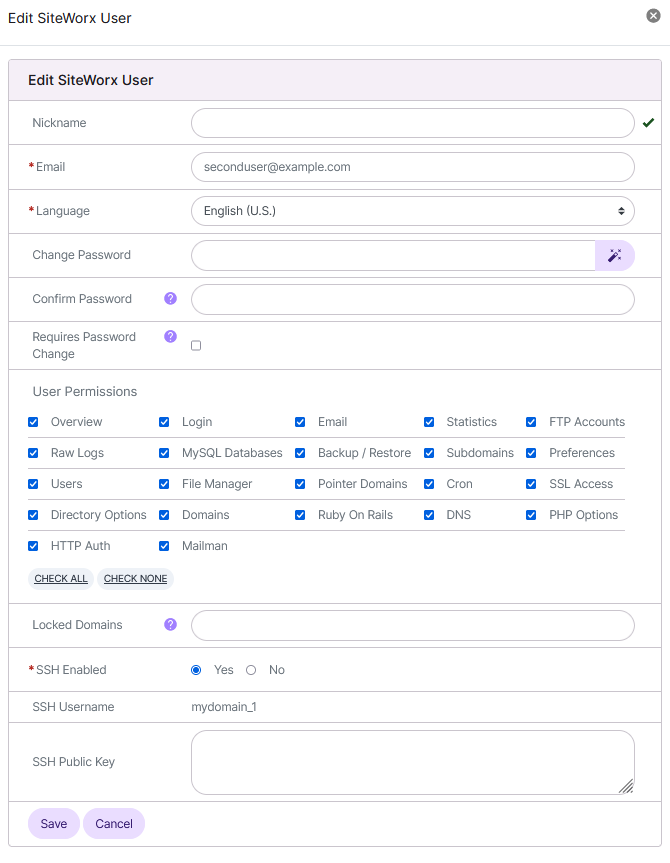
Screenshots use sample data from the InterWorx 8 documentation. The arrows identify the fields used here. Managed VPS SSH in this guide uses public-key authentication. Enter your local key passphrase only when OpenSSH asks for it.
3. Verify the server and connect
Open Terminal or PowerShell on the computer where you made the key. In your command below, replace SSH_USERNAME with the primary Linux username from support or the generated secondary SSH Username. Replace SSH_HOST with the hostname from support, with no https:// or path. Use the port confirmed by support in place of 22 if it differs. The -i path points to your private key on your computer, without .pub.
macOS Terminal
ssh -o StrictHostKeyChecking=ask -o IdentitiesOnly=yes -i "$HOME/.ssh/mvit_managed_vps" -p 22 SSH_USERNAME@SSH_HOSTWindows PowerShell
ssh -o StrictHostKeyChecking=ask -o IdentitiesOnly=yes -i "$env:USERPROFILE\.ssh\mvit_managed_vps" -p 22 SSH_USERNAME@SSH_HOST- On the first connection, compare the algorithm and the full
SHA256:fingerprint shown by OpenSSH with the values in your authenticated support ticket. The fingerprint printed during key generation belongs to your device. Type yes only if the server’s details match exactly. If there is a mismatch, a changed host key warning or any doubt about a previously saved key, stop and contact support before accepting or removing anything. - Enter the passphrase you chose on this device if prompted. A prompt like
Enter passphrase for key …unlocks the local file. If you see a remote account password prompt, stop and recheck the host, username and command with support. - At the remote prompt, run
whoamiandpwdto check your shell user and current directory. If the user differs from what you expect, ask support to confirm the identity before making changes. If you land in a different directory, replace/absolute/path/from/supportwith the approved path. Run the second line after the first succeeds and check that it shows the approved directory.
If the path is missing, inaccessible or unexpected, pause and ask support before editing.cd "/absolute/path/from/support" pwd
Before changing site files during a substantial refresh, confirm there is a current backup and that you know how to restore it.
Type exit to disconnect. Save your filled-in SSH command locally for next time and run it from your computer whenever you reconnect. OpenSSH normally remembers a verified host key for the same hostname and port, even when you connect with another SSH username.
Troubleshoot, switch devices or revoke access
ssh-keygenorsshis not recognized on Windows- In Windows Settings, search for Optional features, add OpenSSH Client, then reopen PowerShell. On a managed computer, ask your device administrator if installation is restricted.
Permission denied (publickey)or identity file missing- Check that the username matches the generated or support-confirmed value, the hostname and port are correct, and the
-ifile exists locally and has no.pubsuffix. Ask support to confirm that the matching public key was installed for that SSH user. - Timeout, connection refused or hostname not found
- Check the SSH hostname and port from the ticket and verify that you are online. If the error continues, send it to Dashboard Support. The dashboard and website can work even when SSH is unavailable.
- Wrong passphrase, lost device or exposed key
- A forgotten passphrase cannot be recovered. Generate a new pair and ask support to install it. For a lost device, exposed key or departing teammate, contact support promptly and identify the exact key or SSH user to revoke. Ask support to close any active sessions that should end.
Switching devices or rotating a working key? Create a separate key on each device, using a distinct filename if a key already exists on that device. Before changing a working key, ask support whether the old and new keys can overlap. The secondary editor has one SSH Public Key field. If only one key can be active, agree on a recovery procedure with support before replacing it. When overlap is available, test the new key from a fresh terminal before asking support to remove the old one. Keep a working session open if possible and keep Dashboard Support available as a fallback. Give each named teammate individual access and have them generate their own key.
Revoking access? For a primary user or one key among several, ask Dashboard Support to remove the particular key. For a supported secondary user whose entire shell access should end, reopen the same editor, set SSH Enabled to No, and select Save. If you still have the retired private key, test a fresh login after confirmation and point -i at that key. It should be rejected. Ask Dashboard Support to verify revocation if you still get in, have lost the key, or cannot tell which key was used.
What to send support. In Dashboard → Support, include the service, domain, SSH username, host and port you tried, operating system, failing step, exact error, and the time with time zone. For a server host-key warning, report the displayed algorithm and fingerprint. For public-key installation or authentication problems, the .pub line is the only key material to include alongside the relevant details. Leave private keys, passwords, passphrases, tokens and unrelated customer data out of the request.
Working with a developer or coding agent
A developer or a coding tool that supports SSH can work on files the authorized shell user can access. Ask support what the account can read and write and which directory and tools are available. SiteWorx panel permissions do not define shell permissions. On Managed VPS, Metro Vancouver IT retains root and KVM console access. Self-managed VPS customers have root and administer their own SSH, outside this guide.
A developer can take responsibility for deployment and recovery. For a coding agent, confirm that SSH is supported from the computer or cloud workspace where it actually runs. Start with a scoped staging task such as reviewing a theme file and review changes before deployment.
Ask support about separate, revocable access before granting direct access to a developer or tool. For a tool, use its documented SSH credential setup if it supports one. Keep all private keys and passphrases out of prompts and shared workspaces. If separate access is unavailable, work on a local or staging copy and have the owner deploy reviewed changes. When the work ends, revoke the access you granted.